
In the world of web development, being able to create a website with user logins and registrations is an essential skill. Whether you’re making a personal blog, an online store, or a social platform, you often need a way for users to sign in and create accounts. In this step-by-step guide, we’ll show you how to make a simple website with login and registration forms using HTML, CSS, and JavaScript.
Table of Contents
Prerequisites for Creating Registration Forms
Before we begin, make sure you have the following tools and knowledge:
- A text editor (e.g., Visual Studio Code, Sublime Text, or Notepad++)
- Basic knowledge of HTML, CSS, and JavaScript
- A web browser for testing.
project-folder/
│
├── index.html
├── style.css
├── script.js
└── README.md
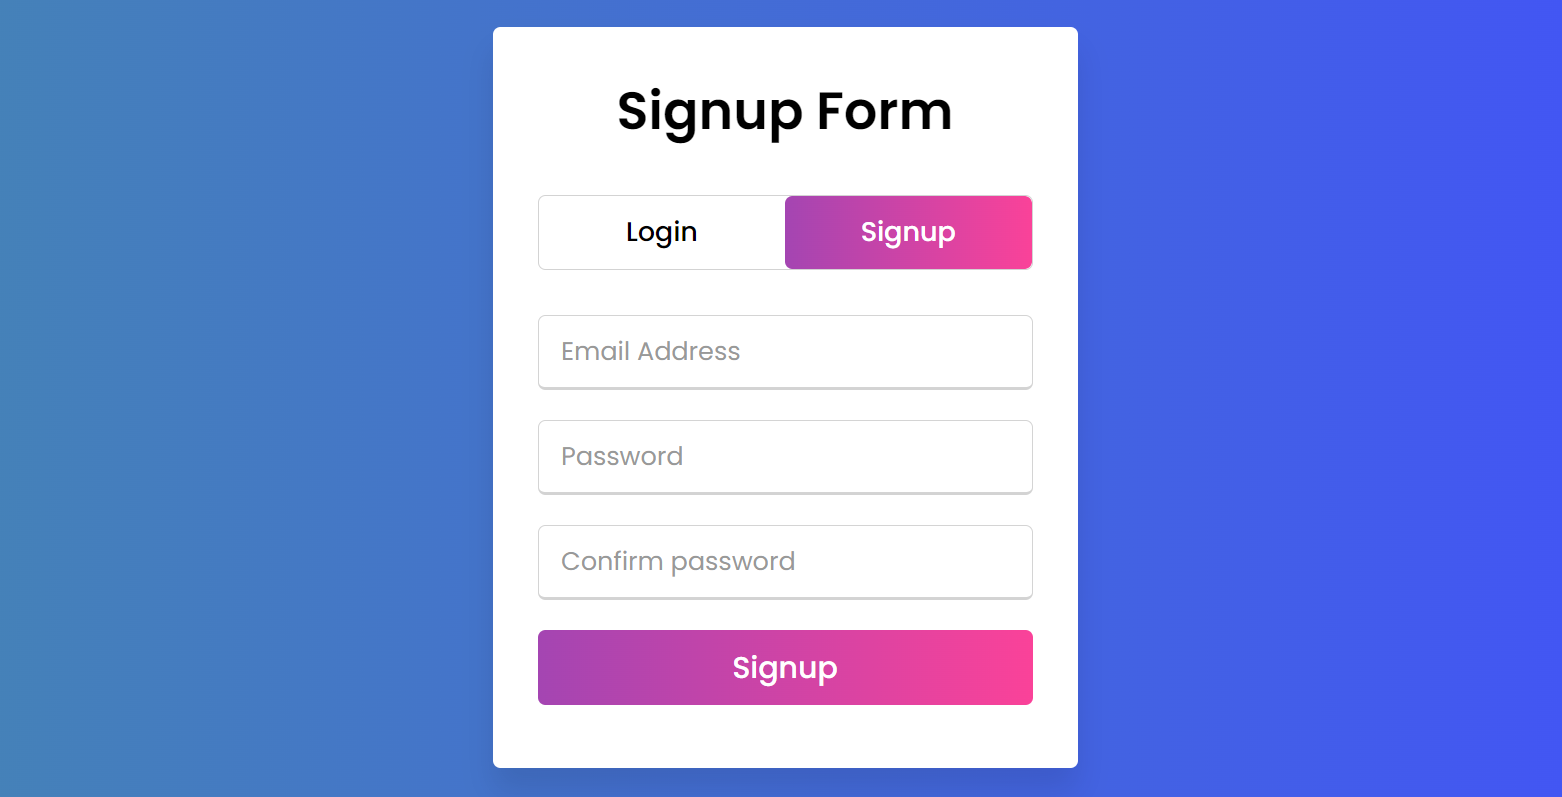
Step 1: Create the HTML Structure for Registration Forms
Let’s start by creating the basic HTML structure for our website:
<!DOCTYPE html>
<html lang="en">
<head>
    <meta charset="UTF-8">
    <meta name="viewport" content="width=device-width, initial-scale=1.0">
    <title>Registration Forms</title>
    <link rel="stylesheet" href="style.css">
</head>
<body>
     <div class="wrapper">
  <div class="title-text">
    <div class="title login">
      Login Form
    </div>
    <div class="title signup">
      Signup Form
    </div>
  </div>
  <div class="form-container">
    <div class="slide-controls">
      <input type="radio" name="slide" id="login" checked>
      <input type="radio" name="slide" id="signup">
      <label for="login" class="slide login">Login</label>
      <label for="signup" class="slide signup">Signup</label>
      <div class="slider-tab"></div>
    </div>
    <div class="form-inner">
      <form action="#" class="login">
        <div class="field">
          <input type="text" placeholder="Email Address" required>
        </div>
        <div class="field">
          <input type="password" placeholder="Password" required>
        </div>
        <div class="pass-link">
          <a href="#">Forgot password?</a>
        </div>
        <div class="field btn">
          <div class="btn-layer"></div>
          <input type="submit" value="Login">
        </div>
        <div class="signup-link">
          Not a member? <a href="">Signup now</a>
        </div>
      </form>
      <form action="#" class="signup">
        <div class="field">
          <input type="text" placeholder="Email Address" required>
        </div>
        <div class="field">
          <input type="password" placeholder="Password" required>
        </div>
        <div class="field">
          <input type="password" placeholder="Confirm password" required>
        </div>
        <div class="field btn">
          <div class="btn-layer"></div>
          <input type="submit" value="Signup">
        </div>
      </form>
    </div>
  </div>
</div>
<script src="script.js"></script>
</body>
</html>
In this HTML structure, we have a form for user registration.
Step 2: Style Your Forms with CSS
Create a file called style.css and add the following CSS to style your forms:
@import url('https://fonts.googleapis.com/css?family=Poppins:400,500,600,700&display=swap');
*{
  margin: 0;
  padding: 0;
  box-sizing: border-box;
  font-family: 'Poppins', sans-serif;
}
html,body{
  display: grid;
  height: 100%;
  width: 100%;
  place-items: center;
  background: -webkit-linear-gradient(left, #4586b2, #4251fa);
}
::selection{
  background: #4295fa;
  color: #fff;
}
.wrapper{
  overflow: hidden;
  max-width: 390px;
  background: #fff;
  padding: 30px;
  border-radius: 5px;
  box-shadow: 0px 15px 20px rgba(0,0,0,0.1);
}
.wrapper .title-text{
  display: flex;
  width: 200%;
}
.wrapper .title{
  width: 50%;
  font-size: 35px;
  font-weight: 600;
  text-align: center;
  transition: all 0.6s cubic-bezier(0.68,-0.55,0.265,1.55);
}
.wrapper .slide-controls{
  position: relative;
  display: flex;
  height: 50px;
  width: 100%;
  overflow: hidden;
  margin: 30px 0 10px 0;
  justify-content: space-between;
  border: 1px solid lightgrey;
  border-radius: 5px;
}
.slide-controls .slide{
  height: 100%;
  width: 100%;
  color: #fff;
  font-size: 18px;
  font-weight: 500;
  text-align: center;
  line-height: 48px;
  cursor: pointer;
  z-index: 1;
  transition: all 0.6s ease;
}
.slide-controls label.signup{
  color: #000;
}
.slide-controls .slider-tab{
  position: absolute;
  height: 100%;
  width: 50%;
  left: 0;
  z-index: 0;
  border-radius: 5px;
  background: -webkit-linear-gradient(left, #a445b2, #fa4299);
  transition: all 0.6s cubic-bezier(0.68,-0.55,0.265,1.55);
}
input[type="radio"]{
  display: none;
}
#signup:checked ~ .slider-tab{
  left: 50%;
}
#signup:checked ~ label.signup{
  color: #fff;
  cursor: default;
  user-select: none;
}
#signup:checked ~ label.login{
  color: #000;
}
#login:checked ~ label.signup{
  color: #000;
}
#login:checked ~ label.login{
  cursor: default;
  user-select: none;
}
.wrapper .form-container{
  width: 100%;
  overflow: hidden;
}
.form-container .form-inner{
  display: flex;
  width: 200%;
}
.form-container .form-inner form{
  width: 50%;
  transition: all 0.6s cubic-bezier(0.68,-0.55,0.265,1.55);
}
.form-inner form .field{
  height: 50px;
  width: 100%;
  margin-top: 20px;
}
.form-inner form .field input{
  height: 100%;
  width: 100%;
  outline: none;
  padding-left: 15px;
  border-radius: 5px;
  border: 1px solid lightgrey;
  border-bottom-width: 2px;
  font-size: 17px;
  transition: all 0.3s ease;
}
.form-inner form .field input:focus{
  border-color: #b183fc;
  /* box-shadow: inset 0 0 3px #fb6aae; */
}
.form-inner form .field input::placeholder{
  color: #999;
  transition: all 0.3s ease;
}
form .field input:focus::placeholder{
  color: #b3b3b3;
}
.form-inner form .pass-link{
  margin-top: 5px;
}
.form-inner form .signup-link{
  text-align: center;
  margin-top: 30px;
}
.form-inner form .pass-link a,
.form-inner form .signup-link a{
  color: #5e42fa;
  text-decoration: none;
}
.form-inner form .pass-link a:hover,
.form-inner form .signup-link a:hover{
  text-decoration: underline;
}
form .btn{
  height: 50px;
  width: 100%;
  border-radius: 5px;
  position: relative;
  overflow: hidden;
}
form .btn .btn-layer{
  height: 100%;
  width: 300%;
  position: absolute;
  left: -100%;
  background: -webkit-linear-gradient(right, #a445b2, #fa4299, #a445b2, #fa4299);
  border-radius: 5px;
  transition: all 0.4s ease;;
}
form .btn:hover .btn-layer{
  left: 0;
}
form .btn input[type="submit"]{
  height: 100%;
  width: 100%;
  z-index: 1;
  position: relative;
  background: none;
  border: none;
  color: #fff;
  padding-left: 0;
  border-radius: 5px;
  font-size: 20px;
  font-weight: 500;
  cursor: pointer;
}
This CSS code will style your registration form, making it visually appealing.
Step 3: Implement JavaScript for Form Functionality
Now, let’s add the JavaScript to make our registration form functional. Create a file called script.js and add the following code:
const loginText = document.querySelector(".title-text .login");
const loginForm = document.querySelector("form.login");
const loginBtn = document.querySelector("label.login");
const signupBtn = document.querySelector("label.signup");
const signupLink = document.querySelector("form .signup-link a");
signupBtn.onclick = (()=>{
  loginForm.style.marginLeft = "-50%";
  loginText.style.marginLeft = "-50%";
});
loginBtn.onclick = (()=>{
  loginForm.style.marginLeft = "0%";
  loginText.style.marginLeft = "0%";
});
signupLink.onclick = (()=>{
  signupBtn.click();
  return false;
});
This JavaScript code handles the registration form functionality and provides placeholders for your registration logic.
You’ll need to add your own server-side logic for user registration. This can be done using a backend language like Node.js, Python, or PHP and a database for user storage.

Conclusion
Creating a website with registration forms is a fundamental skill for web developers. In this tutorial, we’ve shown you how to create a simple HTML, CSS, and JavaScript-based registration form. However, it’s important to note that in a real-world scenario, you should never store sensitive user information in plain text in JavaScript. Instead, always use server-side processing and secure practices for user registration and data storage.
Feel free to expand upon this foundation by adding more features like password validation, user profiles, and enhanced security measures to create a robust web application. Happy coding!


2 Comments
Creating registration forms is an essential skill for web development, and your step-by-step guide is super helpful! 🌐💼 The HTML structure, CSS styling, and JavaScript functionality all come together to create a seamless user experience. Thanks for sharing this valuable tutorial! 👍👩💻 #WebDevelopment #HTML #CSS #JavaScript
[…] now that we know what’s causing the ruckus, how can you calm the storm and make your code play nice with […]